 Here is a nice glass of wine from the mini-bottle of the first batch of mulberry wine - it is anything but sweet! It tastes to me much like a rasberry lambic does, perhaps a little more tart and without the bubbles. The second batch is fermenting nicely, with a beautiful purple layer of yeast capping it. Weird what you think of as beautiful when you are part of this challenge.
Wednesday, June 30, 2010
Sweet Berry Wine
Here is a nice glass of wine from the mini-bottle of the first batch of mulberry wine - it is anything but sweet! It tastes to me much like a rasberry lambic does, perhaps a little more tart and without the bubbles. The second batch is fermenting nicely, with a beautiful purple layer of yeast capping it. Weird what you think of as beautiful when you are part of this challenge.
Tuesday, June 29, 2010
EGGS!
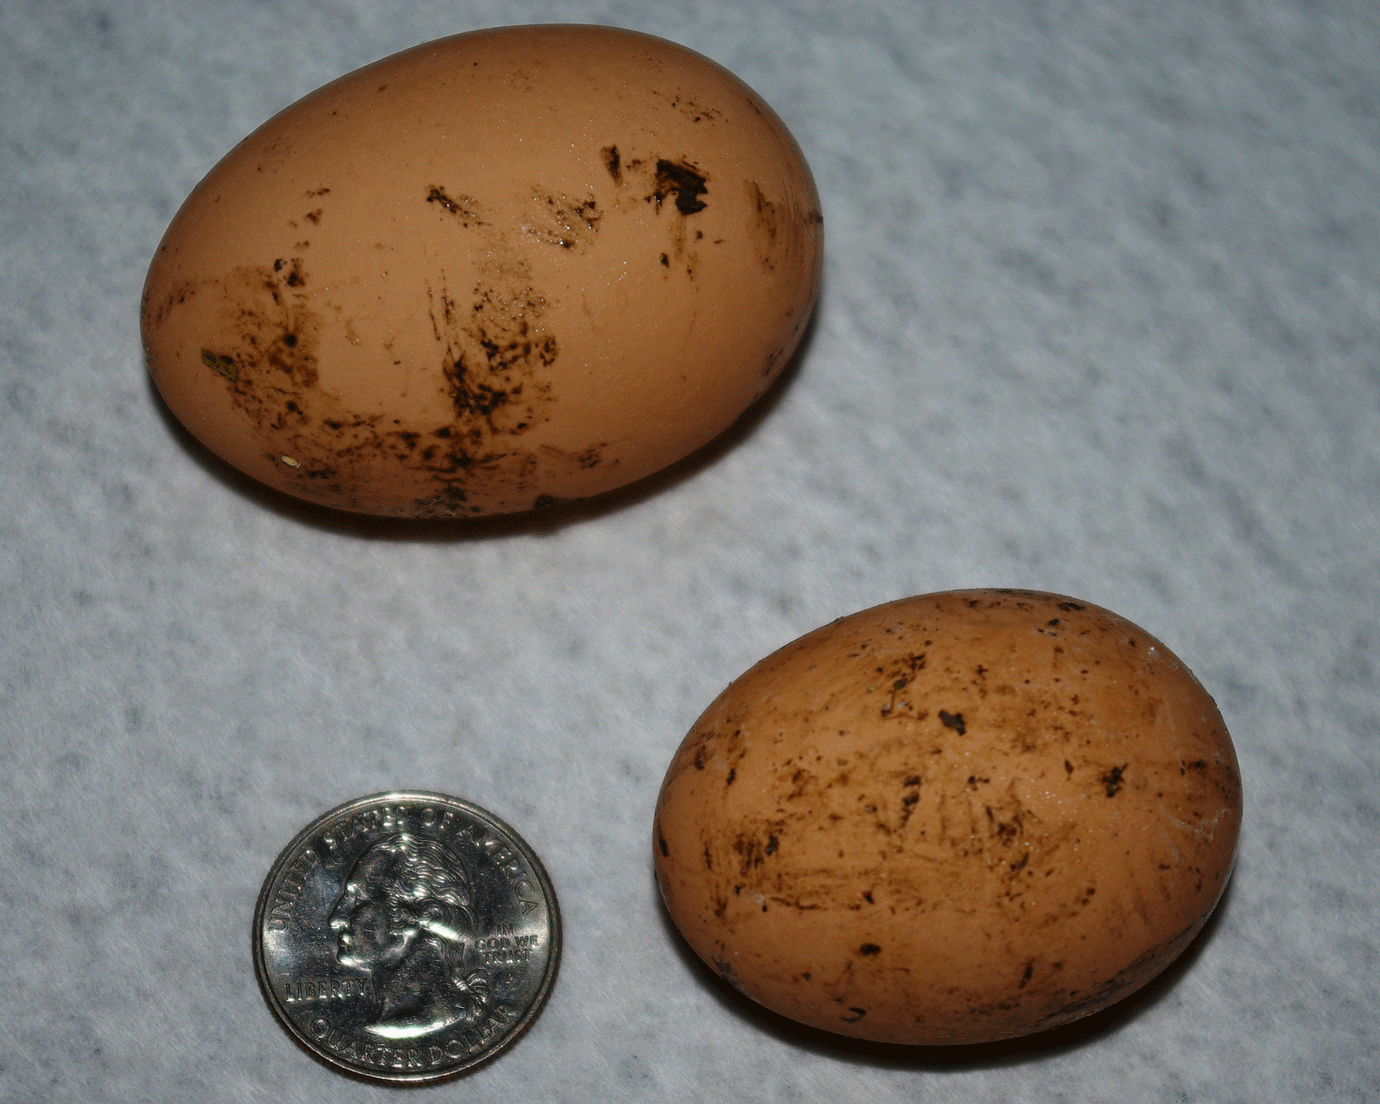
I went out this afternoon to clean the chicken coop and put in some new straw for the lovely lady birds, and discovered that they have laid two eggs!
I know which chicken has not laid them (because her eggs will be blue) but I am not positive who did lay them... though I'm pretty sure my favorite chicken was responsible for one of them... partly because I want to give her credit, and partly because she's been laying like she was nesting rather than hanging out on the roost with the others quite often as of late.
As you can see, they are not extra large eggs like you might buy at the grocery store. I put them in an empty egg carton that we've been saving, and they look so little compared to what we're used to... but I bet they will be much tastier than the grocery store eggs, and it's nice to personally know the chickens they came from! (And to know they've been treated kindly!)
I feel like my chickens gave me a gift today... and I'm going to find an extra special treat for them tomorrow. They really like tomatoes... maybe I'll give them some!
I'm totally excited that egg production has begun... and within plenty of time for the challenge (and with opportunity to have enough to trade!) Woo-hoo!
Thursday, June 24, 2010
Urban Homesteading
What we are trying to do for a week, this family in California does all the time!! Thanks mom for this video on my Birthday :D
You can also check out their website here.
You can also check out their website here.
Monday, June 21, 2010
How My Apartment Garden Grows
I recently returned from a ten day trip to Ohio and was bracing to come back and find my plants kaput. However, I was pleasantly surprised: my roommate took pretty good care of them, and a few plants thrived under his watch.
 Greens on the windowsill: spinach, arugula, and swiss chard.
 The bush tomatoes grow large in my bedroom. There is also a hanging planter of tomatoes in the window.
 Cucumbers, growing in one of the tubs on the floor.
 A zucchini, rescued from a tub that got some kind of mold. It killed the others, but this guy is doing well.


A tangle of beans growing up and tomatoes growing down. These are in the kitchen window.
My tomatoes have been making food for me. I've harvested five bright red tomatoes; straight from the plant and into my mouth!

However, soon after I got back, I had a problem: white flies. They had come in on the tomato plants, and were now infesting all of planters, crawling around the dirt. While they don't damage the plants, they are so annoying, particularly in an apartment. By the the end of last week, they were buzzing around every room, despite my efforts to exterminate them. I realized it was time to take drastic measures.
The greens were big enough to eat, so I harvesting them and made them into an enormous, delicious, home-grown salad. Then I cleaned out the planter--less dirt for the flies to breed in.

The cucumber and zucchini were not getting enough light in my bedroom, so I've given them to a good home. They'll grow, and hopefully flourish, on a rooftop in Astoria.
Today, the remaining tomato plants and beans got a Raid treatment. I had been using soap and water to spray the white flies, but there were just too many, and the soap actually killed my eggplants. So I hope my remaining plants can take it; the seem to still be doing ok this evening.
Needless to say, I won't be participating in the Week; but I am still glad I did this. I've learned quite a bit about what is possible in a tiny apartment.
Sunday, June 20, 2010
Grapes!

On our morning adventure, Kathy and I also found 2 locations with grapes. We will keep checking back until they are ripe enough to pick.
Foraging - Plums

Kathy and I did a 1-mile charity walk this morning, and on our adventure, we found plums!
They were worm filled - yuck! But according to brave and frugal mama's http://www.mothering.com/discussions/showthread.php?t=943805 they are still usable (a couple suggested that they are not treated with chemicals). This was a really gross job because I have a worm phobia. A few were still alive crawling out of the plums. The cleaner, firm pieces I set aside and froze. The mushy more brown pieces, I made into a plum sauce. I cheated and used sugar to preserve them. I consider this equal exchange because of the worm trauma.
Mulberry Mishap :(
The newest batch of mulberries that Mark gave me turned moldy. I checked online and frozen fruit can be dehydrated. If anyone wants to give me fruit to dehydrate, please clean it up and freeze it. You are also more that welcome to borrow my dehydrator.
By the way Mark, in order to make hard candy, you can use the fruit juice but will also need to use sugar & corn syrup http://www.ehow.com/how_4866308_make-hard-candy-juice.html. It won't work in the dehydrator like you proposed. You will get more of a fruit leather.
By the way Mark, in order to make hard candy, you can use the fruit juice but will also need to use sugar & corn syrup http://www.ehow.com/how_4866308_make-hard-candy-juice.html. It won't work in the dehydrator like you proposed. You will get more of a fruit leather.

Wednesday, June 16, 2010
Kale Chips

I swear I posted the recipe for kale chips somewhere on this blog. I made a small amount tonight with the kale Mark gave me last week. Here is the link: http://steamykitchen.com/6926-crispy-kale-recipe.html. I used chives & lemon thyme from the herb tower and olive oil. I am amazed at how fast they were done! They taste pretty good and may even be better tomorrow once the herbs have had a chance to soak in. They could use a bit of salt though.
Culinary Delights
Yes, apparently it is another one of those days when I have a ton of posts.
 I just finished making the 'radish green soup' Sharon had posted earlier. WAY too much lemon flavor, it dominates the soup. Anyone wanting to try this, I'd recommend the zest and juice of 1/4 lemon. It also took about 13 mins for the potatoes to soften, a little longer than the recipe said.
 Here's a couple fresh salads I made, all from garden ingredients. Lettuce, green beans, radishes, green onion, and wood strawberries. I went back and added cheese, tomatoes, and a little turkey before we ate them (its not challenge time yet!!)
 I just finished making the 'radish green soup' Sharon had posted earlier. WAY too much lemon flavor, it dominates the soup. Anyone wanting to try this, I'd recommend the zest and juice of 1/4 lemon. It also took about 13 mins for the potatoes to soften, a little longer than the recipe said. Here's a couple fresh salads I made, all from garden ingredients. Lettuce, green beans, radishes, green onion, and wood strawberries. I went back and added cheese, tomatoes, and a little turkey before we ate them (its not challenge time yet!!)
A Good Day's Collection
 A week ago Sunday was the first day that food was ready from the big garden - and boy was there a lot! We had 11 gallon freezer bags of lettuce and spinach that day. This past Sunday I was at it again, collecting even more! We had 9 more bags of food - 1 bag of radishes, 1 bag of radish greens (many more were discarded, but I wanted to try that soup recipe Sharon sent out,) 2 bags of spinach, and 5 more bags of lettuce! My mother in law took one bag of lettuce since she still had 2 left over from the previous week, which means not only is my freezer full of frozen berries, but my fridge is full of bags of greens! I blanched the spinach and put it in the freezer last night, there is still more lettuce than I could eat in a month!
Mulburied
 Boy that looks delicious, doesn't it? Here is a picture of the first batch of mulberry wine I started. I read and/or heard somewhere that wine is often made using only the wild yeast that naturally exists on the outside of the fruit. After the first few days of collecting these berries I pressed all the juice out of them and put it into a pitcher. I put a lid on the pitcher and covered it with a towel to keep light out. That was one week ago, as of last night. Last night I racked it (in laymans terms, put it in a new container away from all the old yeast and settled debris.) This is a view of the pitcher when I first opened it. As you can see the yeast builds a protective layer on top of the vessel, keeping other undesirable microbes from taking over their delicious fruit juice buffet. The yeast eats the sugars in the juice, and discharges alcohol.
 Here is the resulting containers of racked wine. Yes I tasted it and no it is not death poison. Wine made from straight mulberries has a taste much more like a lambic beer - mulberries are very mild flavored and the tartness found in other fruits just isn't there. The large bottle was salvaged from Dead Horse Bay in New York; the small bottle came from somewhere, it is a nice small size for sharing samples (in a few weeks.) The color is a deep, slightly purple red.
 The third container, the sugar jar, is my first attempt at making vinegar. I added a dose of fluid from what I'll call 'forgotten produce' that had the distinct odor of vinegar to it. Only time will tell if I have a viable culture or not.
 The mulberry tree continues to dump fruit on me at an alarming rate. Every day I go out and collect a large colander full of berries. I have taken to dumping them in the Crock Pot and cooking them for 4 hours, separating the cooked berries from the syrupy cooed juice. I HAVE 10 POUNDS OF FROZEN COOKED BERRIES. I expect the collecting to go on for another 2 weeks, until I have enough berries to mold into bricks and build a shed.
As for my next wine-experiment, the cooked juice has a higher specific gravity than the raw juice does (this means it has more sugar, and thus more alcohol potential.) In a few more days I plan to make a starter (yeast culture) from a day's worth of raw juice, and then mix it into all the cooked juice to make an even better wine!
The Big Garden
 Finally, I remembered to bring my camera on Sunday! Here is a view of the garden, a 75' x 40' plot. The left half of the garden was planted much earlier (and had many more weeds growing as a result, the newer-tilled soil has much less of a problem.)
 Here is a young tomato plant, one of over 70 in the big garden!
 Pictured here is a New Zealand spinach plant- a much more substantial leaf than regular spinach.
 A lettuce plant, growing up amongst the grasses that used to inhabit this space. This is one of the last lettuce plants left from my first planting, and it will be pulled out next Sunday.
 A lovely young cucumber plant - but wait - where are all those missing leaves?!? Curse you rabbits!
 Swiss Chard growing up amongst a sprawl of plants. This area needs a good weeding!
 A pair of cabbage plants, coming along nicely! Lets hope those white moths don't eat too much!
Monday, June 14, 2010


Good Bye Bunnies:)
 Kathy and I installed a fence around the garden yesterday - bye bye bunny rabbits!
Saturday, June 12, 2010
Radishes!
What are the possibilities for radishes besides in a salad?
This link has suggestions to boil, steam or roast them: ttp://www.recipetips.com/kitchen-tips/t--827/all-about-radishes.asp. Roasting: Preheat oven to 425 degrees. Toss with olive oil & favorite seasoning. Roast for 30-45 minutes.
Bread and Butter Radishes:
http://www.chow.com/recipes/10909-bread-and-butter-radishes
Don't throw away the edible greens. This link has a Radish Greens Soup Recipe :
http://www.recipetips.com/recipe-cards/t--2133/radish-greens-soup.asp
Thursday, June 10, 2010
Good Bye Veggies :(
I witnessed it with my very own eyes - the bunny rabbit hopping along my section of the garden, sniffing the pea plants then moving on. He/she then arrived at the corn, chomp, chomp, chomp for breakfast then moved on to the next plant. AAAHHHHH!!!!
Wednesday, June 9, 2010
Good Bye Peaches :(

This is a picture of the beautiful peaches we were going to add to our collection of food. The naughty squirrel got to them before we did :(
Tuesday, June 8, 2010
Building a Walnut Press, Part 1
Please don't try this at home, especially if you're stupid or clumsy. I don't want to be responsible for someone maiming themselves because they read my post and launched themselves into a project haphazardly.
 I had a concept for a press for extracting oil from walnuts, which I had drawn out while we were driving to New York a few weeks ago. I cut these parts out of white styrofoam. I added some sprues (channels for getting the molten metal into the casting.)
 Here I packed the body of the press into casting sand. I picked this sand up a few years ago at a school auction, they were selling foundry equipment.
 Here I have about 4lbs of aluminum loaded into a kiln - I use a cast iron skillet to melt the metal. My guesstimate was a little short of the part, but you'll see more of that later. The aluminum melts at about 1450-1500 degrees. I use high temperature foundry gloves and a steel pipe to slide over the handle, then grab the lip of the pan skillet with a pair of heavy pliers to pour it. Once again, for the incompetent or reckless, don't try this at home.
 Here is the mold after I poured the molten aluminum into it. Fire! You can see a the muffin tin to the lower left that I pour my leftover metal into (aluminum biscuits - yum!)
 Here is the main body casting after it cooled and I took it out of the sand. As you can see the column didn't quite have enough metal to fill out. Time for some grinding!
 Here is the casting after I hacked and ground at it for half an hour. I cut a new handle slot into it using an angle grinder. I'll have to engineer a new handle design to give a little more clearance since the column turned out so short. You'll see that exciting adventure in part 2!
 I had a concept for a press for extracting oil from walnuts, which I had drawn out while we were driving to New York a few weeks ago. I cut these parts out of white styrofoam. I added some sprues (channels for getting the molten metal into the casting.)
 Here I packed the body of the press into casting sand. I picked this sand up a few years ago at a school auction, they were selling foundry equipment.
 Here I have about 4lbs of aluminum loaded into a kiln - I use a cast iron skillet to melt the metal. My guesstimate was a little short of the part, but you'll see more of that later. The aluminum melts at about 1450-1500 degrees. I use high temperature foundry gloves and a steel pipe to slide over the handle, then grab the lip of the pan skillet with a pair of heavy pliers to pour it. Once again, for the incompetent or reckless, don't try this at home.
  Here is the mold after I poured the molten aluminum into it. Fire! You can see a the muffin tin to the lower left that I pour my leftover metal into (aluminum biscuits - yum!)
 Here is the main body casting after it cooled and I took it out of the sand. As you can see the column didn't quite have enough metal to fill out. Time for some grinding!
 Here is the casting after I hacked and ground at it for half an hour. I cut a new handle slot into it using an angle grinder. I'll have to engineer a new handle design to give a little more clearance since the column turned out so short. You'll see that exciting adventure in part 2!
A Fine Collection of Mulberries

This was my brilliant idea for collecting the massive amount of mulberries that dump out of the tree - it is admittedly a little more simple than I had first conceived but it seems to be doing a good enough job. I put it up yesterday around noon - I collected the fruit about an hour ago and there is about 6 cups.
I picked up about an equal amount off the ground around the garden area yesterday, then pressed and strained them. That first batch is going to be fermented into wine, and then hopefully tainted into vinegar before the challenge starts (If I'm lucky the vinegar will be ready before Jul 17th, and I can use it to make some pickles.)


Tuesday, June 1, 2010
Mulberry Mania
 Last post today! Just wanted to show the Mulberry tree out back that is getting ready to dump untold buckets of fruit on the ground. Every year it is a battle to clean them up; this year I'm going to build a visqueen slide to (hopefully) collect them all. My hope is to produce a) preserves, b) syrup, and c)wine & vinegar for the challenge using this abundant resource.
Wood Strawberries

Just, like, 2 more posts, and then I'm done for the day.
These strawberry-like creatures are growing over from the neighbors untamed wilds; I found out today from Wildman Steve Brill's website that they are called 'Wood Strawberries'. They taste like nothing. I ate this one right after I took the picture.
You can see Steve Brill's discussion on strawberries here; http://www.wildmanstevebrill.com/Plants.Folder/Strawberry.html. Too bad his foraging tour was rained out when we went to NYC :(
I also want to mention that I love macro-photography.
2nd Year Kale
 Much like the summer bounty, I am prolific in my blogging today. While walking out to the garage today I looked over in to my 'wild garden' area, specifically at the kale plant which I left growing from last year. I had promised Sharon I would bring her some leaves to make kale chips. I looked over to see how the leaves were developing. They seem to have stopped at a 4-5 inch length, where last year's growth would grow to 10 inches or better on the larger leaves. More interestingly, where there were small flower buds before there are now long stalks with dozens of seed pods on them. I wondered if they were edible (of course I wondered that after I ate one) and found this informative blog out there on the interwebs; http://www.365daysofkale.com/2009/07/coming-back.html. The young seed pods are in fact edible, so I won't have to make any emergency room visits as a result.
My Garden Plan
 I can't seem to remember to bring my camera over to the big garden, so here is a picture of my on-going plan. I have approximately 2600 of the 3000 square feet planted right now, and some of the earlier crops (lettuce and whatnot) are nearly ready for their first harvest. The remainder will be planted this coming up weekend, and a second crop will probably go in once summer harvesting starts in 2 weeks.
How To Burn Soy Nuts

My wife recently brought home a bag of SoyNuts she purchased at the store - I had done a few experiments shortly after harvesting over the winter. Well her purchase inspired me to give it another go, to try to nail down a good recipe/ cooking time. First you boil the dry beans in water for 15 minutes (a quart per half pound). Then what you don't do is put the over to 350 and let them cook for 35 minutes, while you walk away to do other things. The ones in the center of the pan are fine; those on the periphery found their way to the trash.
Subscribe to:
Comments (Atom)

